 English
  Español
  Français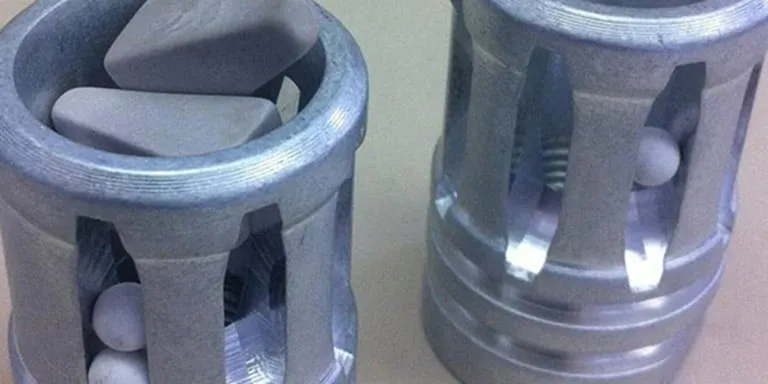
Avoiding Tumbling Media Lodging Issues: Causes, Prevention, and Fixes
| Goal | Rule (Quick Formula) | What It Means | Example (Hole Ø = 6 mm) |
|---|---|---|---|
| Let media pass through a hole (cleaning inside holes) | Media max dimension ≤ Hole Ø × 1/3 | Media is small enough to flow through without frequent bridging | Max media size ≤ 2 mm |
| Pass through more easily (intentional flow) | Media max dimension ≤ Hole Ø × 1/2 | Larger but still likely to pass; faster circulation, slightly higher bridging risk | Max media size ≤ 3 mm |
| Prevent lodging / jamming (anti-stuck) | Media max dimension ≥ Hole Ø × 1.5 | Media is too large to enter the hole and wedge | Min media size ≥ 9 mm |
| Safest “never lodge” approach | Media max dimension ≥ Hole Ø × 2 | Maximum safety margin against lodging in holes/slots | Min media size ≥ 12 mm |
Note: “Media max dimension” means the largest outside measurement of the media shape (e.g., cone base diameter, triangle edge length, cylinder diameter).
Tumbling media lodging (media getting stuck inside holes, slots, threads, pockets, or cavities) is one of the most common hidden problems in mass finishing. It slows production, creates rework, risks part damage, and can ruin an otherwise stable finishing process.
The good news: lodging is highly predictable. Once you understand where it happens and why it happens, you can eliminate most lodging issues with the right media shape/size, machine settings, and simple process controls.
In this guide, you’ll learn the real causes of media lodging, the fastest prevention methods, and practical troubleshooting steps you can apply immediately in vibratory finishing, centrifugal disc finishing, and barrel finishing.
What Is Tumbling Media Lodging?
Media lodging means the finishing media becomes trapped in part features such as:
- Through-holes and blind holes
- Slots, keyways, and deep pockets
- Threaded holes and internal threads
- Cross-drilled holes
- Thin-wall cavities and undercuts
When lodged media isn’t detected quickly, it can cause:
- Extra labor (manual picking, probing, shaking)
- Quality defects (unfinished edges or stained surfaces)
- Part damage (denting, peening marks, thread deformation)
- Downstream issues (plating/painting contamination, assembly failure)
 Abrasive media that match the size
Why Tumbling Media Gets Stuck: The Real Causes
1) Wrong media size for the feature
The most common lodging scenario is simple geometry:
- If media is slightly smaller than a hole, it can enter and wedge.
- If media is close to slot width, it can turn sideways and lock.
- If media is small enough to enter but too large to exit from a blind feature, lodging becomes guaranteed.
2) Shape “locks” into holes or threads
Angular shapes (triangles, pyramids, aggressive wedges) are great for cutting, but they are also the easiest to jam in complex geometry—especially threaded holes or cross holes.
3) Part design creates a “trap”
Features like undercuts, stepped bores, intersecting holes, or thin channels create mechanical traps where media can’t flow out naturally.
4) Too much energy forces media into features
High vibration amplitude, high disc speed, or over-aggressive compounds can push media into holes more violently—especially when the load is heavy or the batch is overfilled.
5) Incorrect part-to-media ratio
If there’s not enough media, parts collide more and “press” media into openings. If there’s too much media, it can pack into pockets and compact under pressure.
6) Poor separation and rinse control
Sometimes lodging happens earlier but is only discovered during separation or rinsing. Weak rinse flow, poor screening, or inadequate agitation can allow lodged media to remain hidden until final inspection.
How to Prevent Media Lodging (Most Effective Methods)
Step 1: Choose a media size that cannot enter the feature
This is the #1 prevention rule:
- Pick media that is clearly larger than the smallest hole/slot opening that must remain media-free.
- For mixed geometry parts, use the smallest critical opening as your sizing reference.
Practical rule of thumb: if a feature is 6 mm wide, don’t choose 5–6 mm media. Choose something that is meaningfully larger (or redesign the process to use a smaller media that can fully pass through without jamming).
Step 2: Prefer rounded shapes when parts have holes and threads
Rounded and low-angularity shapes typically lodge less:
- Ball media (burnishing / polishing)
- Cylinders (more stable flow than triangles)
- Cones (often safer than sharp triangles for holes)
If you must use aggressive cutting media, test a less “locking” geometry first (for example: switching from sharp triangles to a cylinder or a more rounded triangle style).
Step 3: Use two-step finishing instead of one “do everything” cycle
A common mistake is trying to deburr and polish in one heavy cycle. That often requires aggressive media that tends to lodge.
Instead:
- Step 1: Controlled deburring (media selected for cutting but still lodging-safe)
- Step 2: Smoothing / burnishing (rounded, non-lodging media)
This approach reduces risk and improves finish consistency.
Step 4: Reduce process energy if lodging begins
If you observe lodging, reduce the force that pushes media into features:
- Lower vibration amplitude (or adjust weights)
- Reduce speed (centrifugal disc / barrel)
- Reduce cycle time (and run multiple shorter cycles if needed)
- Adjust water/compound flow for smoother movement
Step 5: Improve load stability and orientation
Parts with holes facing upward or parts stacking tightly can “trap” media. Improvements that help:
- Increase media-to-part ratio so parts float and separate better
- Use fixtures or separators when parts are prone to nesting
- Avoid overloading the bowl or disc
Best Media Options to Reduce Lodging (By Finishing Goal)
For deburring (but lodging-sensitive parts)
- Less angular ceramic shapes (rounded triangles, cylinders)
- Smaller, consistent size distribution (avoid mixed sizes)
- Consider plastic media if ceramic is too aggressive for geometry
For smoothing and polishing
- Porcelain media (good for general polishing)
- Zirconia balls (excellent for high-gloss burnishing, very durable)
- Stainless steel media (burnishing; ensure separation and rust-control practices)
Note: For delicate holes/threads, burnishing media often reduces lodging risk because it’s typically rounded and flows more predictably.
 Tumbling media shape
Troubleshooting: What to Do If Media Is Already Lodging
1) Confirm where it lodges (and measure the feature)
Identify the smallest opening that is lodging-prone and measure it precisely. In many cases, changing media size by even 1–2 mm resolves the issue completely.
2) Check media wear
Media size changes over time. Worn media can become small enough to enter holes that were previously safe. If lodging “starts happening suddenly,” check media wear and replace or reclassify media size.
3) Reduce energy and shorten the cycle
If lodging is caused by excessive force, lower energy and run a shorter cycle—then inspect. Often, two short cycles are safer than one long aggressive cycle.
4) Add a post-process de-lodging rinse step
For challenging parts, build a consistent de-lodging routine:
- High-flow rinse + agitation
- Air blow + vibration/shake table
- Ultrasonic rinse for complex cavities (when compatible)
5) Consider process redesign if geometry is a permanent trap
If a part has features that mechanically trap media (like undercuts or stepped blind bores), prevention may require:
- Switching to smaller media that can pass through freely
- Switching to a different finishing method (brush deburring, abrasive flow machining, etc.)
- Changing the part design (preferred if possible)
 Parts separation from media
Quick Checklist: Prevent Lodging Before You Run Production
- Measure the smallest hole/slot opening and choose media accordingly
- Prefer rounded shapes for threaded or cross-hole parts
- Avoid “borderline” media sizes close to the opening size
- Do a short test run and inspect early (first 5–10 minutes)
- Monitor media wear and size drift over time
- Improve rinsing and separation so lodged media is detected immediately
FAQ: Tumbling Media Lodging
How do I choose the right media size to avoid lodging?
Start with the smallest opening on the part. Choose media that is clearly too large to enter that opening, or use media that is small enough to pass through completely without wedging (never “almost the same size”).
Which media shapes lodge the most?
Highly angular shapes (sharp triangles, wedges, pyramids) lodge more often—especially in threads and cross-holes. Rounded shapes and ball media lodge less in most real-world cases.
Why did lodging suddenly start happening even though the process didn’t change?
Most commonly: media wore down and became small enough to enter holes; or a new batch of parts has slightly different hole sizes; or machine energy increased due to maintenance/weight changes.
Can I fix lodging just by changing compound?
Sometimes compound changes help flow, but most lodging is driven by geometry and size/shape selection. Compound is a secondary lever—use it after correcting media selection.
Need Help Selecting Non-Lodging Media?
If you tell us your part material, smallest hole/slot size, finishing goal (deburr / smooth / polish), and machine type, we can recommend a proven media shape and size with starter parameters (media-to-part ratio, water/compound dosing, and cycle time) for a stable, non-lodging process.