 English
  Español
  Français
Size Matters: Choosing the Right Tumbling Media Size (Deburring, Smoothing & Polishing)
When people talk about tumbling media, they often focus on material (ceramic vs plastic) or shape (triangle vs cone). But in real production, the most expensive problem usually comes from one thing: choosing the wrong media size for your part geometry.
Wrong media size.
Choose the wrong size and you’ll see:
media stuck in holes, slots, and threads
scratches caused by trapped media
unstable results and longer cycle time
slow separation and wasted labor
This guide shows how to choose the correct tumbling media size for vibratory finishing and centrifugal barrel finishing—with simple rules you can apply immediately.
Why Media Size Matters So Much
Media size controls three key outcomes:
1) Reach (Can the media enter the feature?)
Smaller media can reach tight corners, holes, and small channels.
2) Cutting & finishing efficiency (How fast can you hit the target?)
Larger media typically creates stronger contact and can speed up external edge deburring.
3) Separation (Can you separate parts fast without hand-picking?)
If media lodges, separation becomes a labor problem—and labor is expensive.
In most shops, “media stuck” is the #1 reason vibratory finishing becomes frustrating.
Step 1: Measure the Part Features First (Before Choosing Media)
Collect these dimensions (even rough numbers are better than guessing):
Smallest through-hole diameter
Smallest slot width / channel width
Any blind holes / pockets
Threads (yes/no)
Thin walls or fragile edges (yes/no)
Then decide your strategy:
Do you want media to enter holes/slots (internal finishing)?
Or do you want media to avoid holes/slots (prevent lodging)?
This single decision determines your safest media size.
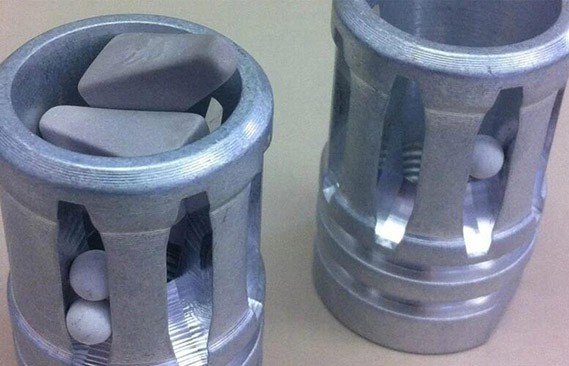 Prevent media lodging in parts
The Two Core Rules (Use These Every Time)
Rule A — If you do NOT need to finish inside holes/slots
Choose media size that cannot enter the opening.
Goal: zero lodging, fast separation, stable production.
This is the most common and most stable strategy for CNC milled parts.
Rule B — If you DO need to finish inside holes/slots
Choose media that is small enough to enter and exit reliably.
Avoid sizes that “barely fit.”
Media that almost fits will wedge as soon as burrs or chamfers are present.
Size of the media
It’s easy to choose the wrong size of the media when cleaning certain parts.
If that happens, the parts could sustain damage, or the cleaning job won’t be successful.
In general, larger media is suitable for quick deburring or finishing.
On the other hand, media that is smaller will take more time to finish the cleaning job.
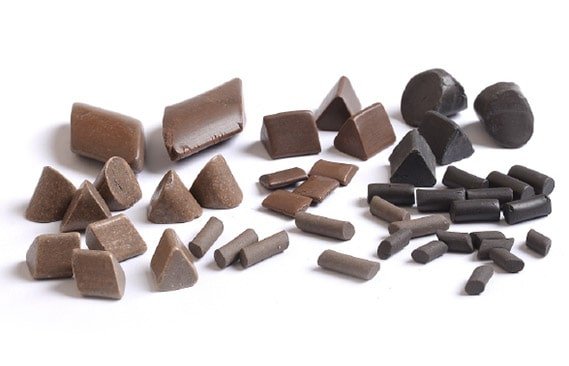 Different size of tumbling media
Quick Decision Table: Size Strategy by Feature
| Feature | Your Goal | Safer Size Strategy | Common Risk |
|---|---|---|---|
| Through holes | Avoid lodging | Media larger than hole | None (best stability) |
| Through holes | Finish inside | Media clearly smaller than hole | Wedging if “almost fits” |
| Blind holes / deep pockets | Usually avoid entry | Media larger than opening | Trapped media is hard to remove |
| Slots / channels | Finish inside | Media smaller than slot width | Bridging if media is too long |
| Threads | Usually avoid entry | Media larger than thread opening | Media stuck in threads |
| Fragile edges | Gentle finishing | Smaller media + softer grade | Insufficient deburr if too gentle |
What Happens When You Change Media Size?
Smaller media tends to:
✅ reach small features better
✅ create more uniform contact on complex geometry
⚠️ increase lodging risk
⚠️ sometimes slow heavy deburring on external edges
Larger media tends to:
✅ deburr external edges faster
✅ separate more easily (if holes are protected)
⚠️ miss internal features
⚠️ risk denting soft metals if the process is too aggressive
The Most Common (Costly) Mistakes
Mistake 1: Choosing media that “almost fits”
This is the #1 cause of lodged media.
Mistake 2: Ignoring blind holes and pockets
Even if the opening seems safe, deep pockets can trap media.
Mistake 3: Optimizing for finishing speed, ignoring separation time
A fast cycle doesn’t matter if your team spends 20 minutes picking media out.
Mistake 4: Using one media size for everything
Group your parts by risk features:
“no holes / no slots” group
“holes/slots present” group
“threads / blind pockets” group
Standardize media per group.
A Simple 5-Step Method (Recommended for New Parts)
Measure smallest opening (holes/slots/threads)
Decide: internal finishing yes/no
Choose: “enter reliably” or “never enter” size strategy
Confirm separation method (screen / separator / magnetic, etc.)
Run a short sample test to verify:
no lodged media
consistent finish
acceptable cycle time
easy separation
FAQ
Q1: What’s the easiest way to prevent media stuck in holes?
Choose media that is larger than the smallest hole/slot (if internal finishing is not needed).
Q2: If I must finish inside holes, how do I avoid wedging?
Use media clearly smaller than the opening. Avoid “barely smaller” sizes.
Q3: Can compound or longer time solve lodged media?
Not reliably. Lodging is mainly a geometry + size issue.
Q4: Does media size affect surface roughness?
Yes. Smaller media can improve uniformity on complex shapes; larger media can improve external deburring speed. Final finish depends on media material and cutting grade too.
Conclusion
Media size selection is not guesswork. It’s a simple engineering choice based on:
your smallest part features
whether you need internal finishing
separation efficiency and labor cost
If you want stable production, avoid “almost fitting” sizes and confirm with a quick sample test.