 English
 Español
 Français

Struggling with the rough, layered look of your 3D printed parts? This unprofessional finish can hurt performance and sales. Automated mass finishing is the key to achieving smooth, consistent results efficiently.
The best finishing option for 3D printed parts depends on your material, volume, and desired surface. For batch production, mass finishing methods like vibratory tumbling offer a scalable, cost-effective solution for smoothing surfaces, removing layer lines, and deburring parts with high consistency and minimal labor.
When you pull a part off a 3D printer, the work isn’t done. The surface is often rough with visible layer lines, which might not be acceptable for the final product. You need a way to turn that raw print into a professional, finished piece. The good news is that you have several options, each with its own benefits. Understanding these methods is the first step toward improving your production workflow and the quality of your parts. Let’s explore the most common techniques to see which one fits your needs.
1. What are the different processes for 3D printed part post-processing?
1.1 . Vapor Smoothing
This process uses a chemical solvent vapor, like acetone for ABS plastic, to slightly melt the outer surface of the part. This melting action smooths out the layer lines, creating a very glossy, almost injection-molded look. The downside is that it only works on specific materials that react to the solvent. You also have to handle and store chemicals safely, which can be a challenge.

(Source: 3dwithus)
1.2 Manual Sanding

3D printed parts before and after manual sanding (courtesy 3Dprint.com)
This is the most basic method. You simply take sandpaper and work on the part by hand, starting with a coarse grit and moving to a finer one. It’s a good option if you only have one or two parts, like a prototype. However, it is extremely labor-intensive and it’s very difficult to get a consistent finish across multiple parts. I once spent an entire afternoon sanding a single complex part, and I can tell you it’s not a scalable solution for any kind of production.
1.3 Sand Blasting
The bead blasting process involves using a spray gun to shoot fine media in a bead or sphere to smoothen the 3D-printed objects.The process works just like sanding or abrasive blasting.However, it is more efficient in finishing the hard-to-reach spots, and it is also less time-consuming.

| Harsh | General | Mild |
| Aluminum Oxide | Plastic Shot Blasting Media | Soda Blasting Media |
The suggested media for 3D printed parts post-processing
1.4. Tumbling (Mass Finishing)
This is where we specialize. This automated process involves placing your 3D printed parts into a machine, like a vibratory tumbler finishing machine, along with abrasive or polishing media. The machine’s movement causes the media to rub against the parts, gradually grinding down and smoothing the surface. It is the perfect solution for finishing dozens or even hundreds of parts at the same time, delivering a uniform finish that is impossible to achieve by hand.
 3d printed plastic parts tumble finishing before and after
2.1 How do different 3D printing finishing processes compare?
Choosing between manual, chemical, and mass finishing methods is confusing. Making the wrong choice can lead to inconsistent quality, high labor costs, and production bottlenecks that hurt your business.
Manual sanding offers control but is slow and inconsistent. Vapor smoothing gives a glossy finish but is material-specific. Mass finishing provides the best consistency and scalability for production, making it the most cost-effective choice for manufacturing.

To help you decide, I’ve found that a direct comparison is the most helpful tool. Let’s break down how these three methods stack up against each other based on the factors that matter most in a production environment. I always advise my clients to think about their long-term goals. Is this a one-time project, or are you building a product line? The answer will heavily influence your choice.
| Feature | Manual Sanding | Vapor Smoothing | Sand Blasting / Media Blasting | Mass Finishing |
|---|---|---|---|---|
| Consistency | Low | High | High | Very High |
| Scalability | Poor | Moderate | Good | Excellent |
| Labor Cost | High | Low | Low to Moderate | Very Low |
| Material Compatibility | Very Wide | Limited (Specific Plastics) | Wide (Plastics + Metals; media-dependent) | Wide (Metals, Durable Plastics) |
| Best For | Prototypes, One-offs | Aesthetic Parts (ABS, ASA) | Uniform Matte + Paint Prep + Complex Geometry | Batch Production, Functional Parts |
| Finish Quality | Operator Dependent | Glossy, Smooth | Even Matte / Satin Texture | Consistent Matte or Polished |
| Setup Cost | Very Low | Moderate to High | Moderate | Moderate to High |
| Geometry Access | Poor for recesses | Process-based | Good (reaches recesses well) | Good (watch media trapping) |
| Main Risk | Inconsistency, time | Distortion / detail loss | Edge rounding, over-blasting | Media lodging, part-on-part damage |
As you can see, manual sanding is cheap to start but expensive in the long run due to labor. It’s great for a hobbyist, but not for a business. Vapor smoothing is interesting for its unique glossy finish, but its limited material compatibility makes it a niche solution. For any company looking to produce 3D printed parts in volume, mass finishing is the clear winner. It’s an investment in equipment, but it pays for itself quickly through massive labor savings, unparalleled consistency, and the ability to scale your production up or down as needed. It turns post-processing from a manual chore into a reliable, automated part of your manufacturing line.
3. How can we help you get the best results with mass finishing?
You know mass finishing is the right solution, but you’re worried about the complexity. Choosing the wrong machine or media could be a costly mistake, delivering poor results and delaying production.
We eliminate the guesswork. We analyze your parts, develop a custom finishing process, and prove the results with a free sample finishing. This ensures you get the perfect machine and media combination for your specific needs.
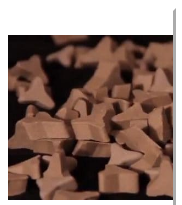 Ceramic Tumbling Media Star shaped (fast material removal) Best used on: Titanium, Stainless steel | 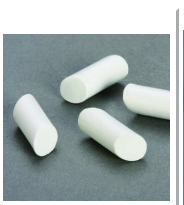 Porcelain Media Cylinder shaped (burnishing & polishing) Best used on: Ultem, PPSF, PC | 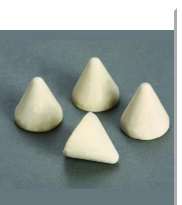 Plastic Tumbling Media Cone shape (light cutting & polishing) Best used on: PC-ABS or M30 |
This is the part of the process I enjoy most—helping a customer find that “aha” moment. You have a great 3D printed product, but the finish isn’t there yet. We can bridge that gap for you. Our approach isn’t just about selling you a machine; it’s about providing a complete solution.
4. Typical Finishing Process for Plastic 3D Printed Parts (Vibratory Finishing)
| Step | Goal | Machine | Media | Process Type | Typical Time | Notes |
|---|---|---|---|---|---|---|
| 1 | Level layer lines + light smoothing | Vibratory finishing machine | Plastic media 2000# cone, 15mm | Wet vibratory (recommended) | 2–4 hours | Use light compound + water for cleaner results. Avoid over-processing thin walls and sharp details. |
| 2 | Dry brightening + surface clean-up | Vibratory finishing machine | Walnut shell media 20# | Dry vibratory | 1–2 hours | Best for drying + removing haze and residue. Add polishing paste if you want a slightly higher shine. |
Quick Tips:
- Separate fragile parts: use part separators or run smaller batches to prevent part-on-part marking.
- Rinse between steps: after Step 1, rinse parts and media residue before moving to the dry step.
- Test first: run 30–60 minutes as a trial to confirm the surface is improving without rounding features.
5. Typical Finishing Process for 3D Printed Metal Parts (Centrifugal Disc / Centrifugal Barrel)
| Step | Goal | Machine | Media | Typical Time | Notes |
|---|---|---|---|---|---|
| 1 | Fast cutting / support mark blending | Centrifugal barrel machine or centrifugal disc machine | Fast cutting ceramic media 20×20mm | 2–4 hours | Use water + compound to control cutting and keep parts clean. Check edges/features every 60–90 minutes to avoid over-rounding. |
| 2 | Smoothing / refine scratch pattern | Centrifugal barrel machine or centrifugal disc machine | Plastic media 2000# cone, 20mm | 2–4 hours | This step reduces ceramic lines and evens out the surface. Rinse parts after Step 1 before switching media. |
| 3 | Fine polishing / bright finish | Centrifugal barrel machine or centrifugal disc machine | Fine porcelain media (polishing) | 1 hour | Best for a clean, bright surface before coating or final buffing. Use a mild burnishing compound for best shine. |
Process Notes (Best Practice):
- Rinse between steps: avoid cross-contamination (ceramic grit can scratch during polishing).
- Protect delicate geometry: for thin walls or lattices, reduce load and run shorter checks.
- Separate parts if needed: use part dividers or run smaller batches to prevent part-on-part impact marks.
6. Conclusion
Finishing 3D printed parts is essential for a professional product. Mass finishing is the only scalable, consistent, and cost-effective solution for production, and we are here to help you implement it.Related Reading